Adding a resource
| Site: | Sunnyside LEARN |
| Course: | Learn 101- Basic |
| Book: | Adding a resource |
| Printed by: | Guest user |
| Date: | Sunday, June 7, 2026, 8:02 AM |
Description
Adding resources
1. Intro to Resources
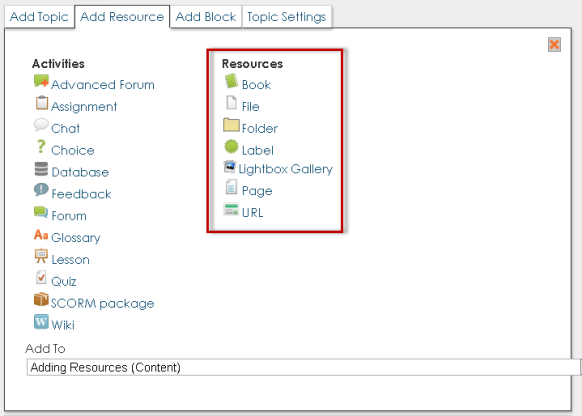
By clicking on the ![]() in a topic box, the following options will appear. This is a list of all the different activites (assignments) and resources that are available. It may not always be the same as new modules can be added and modules can be turned on and off by the administrator. Resources are highlighted in the red box as this is what we will be focusing on in this course.
in a topic box, the following options will appear. This is a list of all the different activites (assignments) and resources that are available. It may not always be the same as new modules can be added and modules can be turned on and off by the administrator. Resources are highlighted in the red box as this is what we will be focusing on in this course.
2. Resource Descriptions
By hovering the mouse over any of the resources, you get a brief description of what that resource is:

Book: The Book module makes it easy to create multi-page resources with a book-like format. This module can be used to build complete book-like websites inside of your Moodle course.
File: Allows you to link to any file (Word, PowerPoint, Excel, PDF, etc.) that you have uploaded into your course files area from your own desktop computer.
Folder: The Directory resource type can be used to display a whole directory (and its subdirectories) from your course files area. Students can then browse and view all those files.
Label: Labels are a little different from other resources because they are text and images that are actually embedded directly among the other activity links in the course page.
Lightbox Gallery: The Lighbox Gallery allows you to create image galleries within your Moodle course
Page: This sort of resource makes it easy to develop a complete single web page within Moodle, especially when you are using Moodle's WYSIWYG HTML editor.
URL: This resource type allows you to link to any web page or other file on the public web. Normal web pages are simply displayed as they are, while multimedia files are dealt with more intelligently and may be embedded within a web page. For example, MP3 files will be displayed using a built-in streaming player, as will movie files, flash animations and so on. There are many options for displaying your content in popup windows, framed windows and so on.
3. The Three Essential Resources
There are three essential resources to create a basic course, Label, File and URL. We will look only at these 3 labels in this course as the goal is to get a basic course up and running.
![]()
You can use the label to insert text and images directly into your course
____
![]()
The File resource is how you add pdfs, powerpoints, Word documents and other files you want your students to access in your course.
____
![]()
The URL resource is how you send your students to other web sites you want them to use in your class.
By knowing how to use these three resources, you can set up a basic course. Be sure to check out the screencasts for demonstrations and how to set up these resources.