Getting Started
| Site: | Sunnyside LEARN |
| Course: | Learn 101- Basic |
| Book: | Getting Started |
| Printed by: | Guest user |
| Date: | Sunday, June 7, 2026, 9:24 AM |
Description
Essential information to begin adding and editing text to your course including turning editing on, understanding the icons and branding your course.
1. Turning Editing on and what you see
Now that you have made some initial decisions about the name and look of your class, it is time to start putting content in your class. First turn editing on by clicking on the "Turn Editing On" button, upper right corner of the screen.
![]()
You should see something like this in your course:

The top row, which has the News forum or Class announcements is the "header" of your class. Here you can brand your class. For example, you could enter, Welcome to 6th Grade Social Studies, or AP Biology or whatever makes sense for your class. You can also upload images to brand your class. The boxes below the header are the topic boxes. The topic boxes are where are you build the different units/topics of your course. Before we begin branding the course and adding contentt, though, let's take a look at the icons and what they do.
2. Understanding topic box icons
Topic/Content Box icons
These are the icons you will see at the top of every topic box:

Add a Resource - Used to add a resource (link, document etc.) or an activity (assignment, quiz, forum etc.)
Edit - Used to edit the topic. For example change the topic's name, add a topic description.
Hide - Used to hide the topic from student view
Highlight Topic as Current Topic - Used to highlight the topic as current topic so it is easily located by students.
Show only this Topic - Used to hide all the other topics of the course from students.
3. Understanding the Resource and Activity Icons
Resource and Activity icons
![]()
You will find this set of icons next to every resource or activity you set up in your class, for example any links, documents, quizzes or assignments you provide for your class. In the image above, they are next to a forum activity. Briefly, here is what they do:
Edit the title - This icon will allow you to change the name of the activity or resource.
Indent - When you have a lot of resources and activities under a topic you may want to indent them to visually organize them along the lines of an outline.
Edit - This icon will take you back to the set up page of the resource or activity. You can make changes and save them.
Duplicate - makes a copy of a resource or activity that can be moved to another part of the course.
Delete - removes a resource or activity.
Hide - hides a resource or activity from student view. This is useful if you want to set activities up ahead of time and don't want the students to see them until it's time for them to be completed.
Advanced - these icons will not be discussed in Learn 101 as they are not necessary to get a course up and running.
4. Branding your class
Remember: The box at the top is your "course header." It has no label (unlike the Topic boxes that are labeled with Topic 1, Topic 2 etc.). It cannot be moved. However, you may brand your course here by adding text, pictures and essential documents and links.
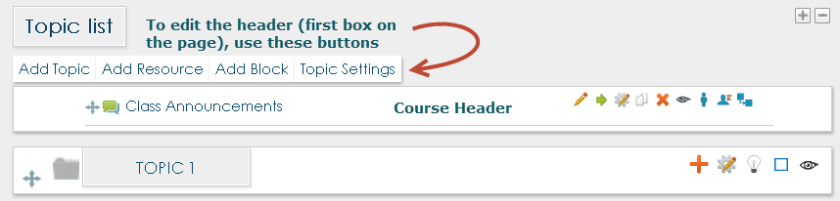
To begin branding your course click on the Topic Settings button.
This is where the "Toolbar" comes in. Just like in Microsoft Word, the icon buttons can be used to make custom edits to your topic box.
You can click the following link for more detailed descriptions of How to add pictures